You can now manage your inventory more smartly by setting aside stock for specific needs using Inventory Reservation. It lets you create separate pools of inventory based on your own rules, like adding buffers, setting exclusions, or deciding which stock goes where. So whether it’s for B2B or B2C, you can choose exactly how to use your inventory and make sure the right stock is always available in the right place.
Use Case Scenario
Let’s say your best-selling product is running low on stock, and you want to make sure your website customers don’t miss out. With Inventory Reservation, you can set aside a specific quantity just for your online store. So even if orders come in from other channels like offline stores or third-party marketplaces, your website inventory stays protected and your top customers aren’t disappointed.
Applicability
Version: Standard, Professional and Enterprise clients
Traceability: None, SKU
Procedure
- Login in your uniware account.
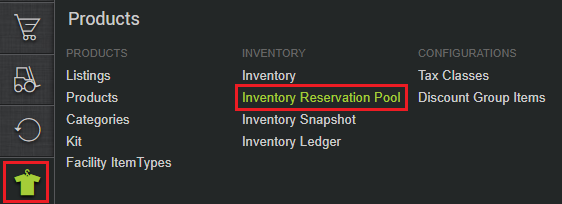
- Navigate to the Products > Inventory Reservation Pool.
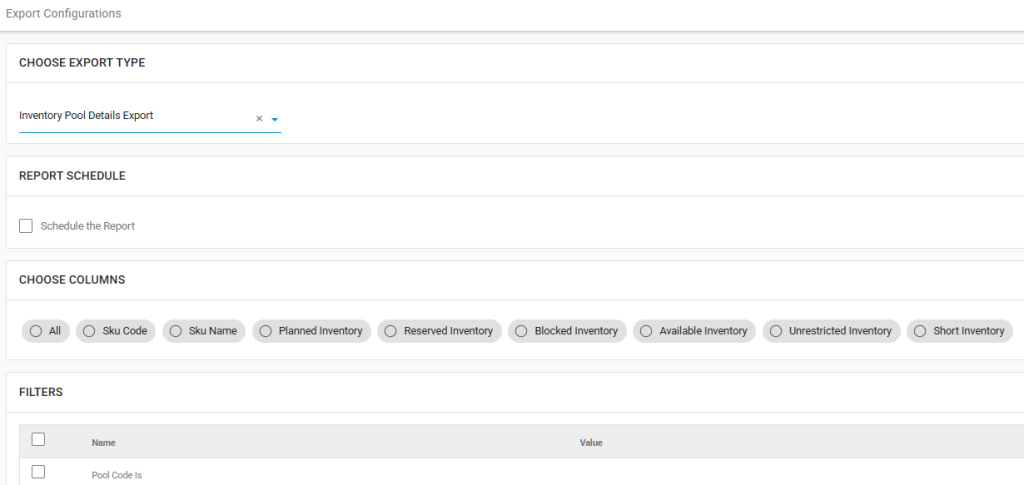
- You’ll see six tabs available on this screen.The table below explains all the states of the pool.

State(s) Description CREATED This is the initial state of a pool right after it’s been configured. The pool remains in this state until its activation date arrives. Before it becomes active, you can choose to mark the pool as Inactive if needed. ACTIVE A pool moves to the “Active” state on its defined activation date. Once active, the pool starts functioning based on its defined rules. After this point, to disable the pool, you can mark it Suspended. INACTIVE A pool marked as “Inactive” will not participate in inventory reservation. This state can only be applied before the pool becomes active on its activation date. Once the pool has been activated, it can be moved to Suspended state. EXPIRED A pool is marked as “Expired” once its end date is crossed. In this state, it no longer takes part in inventory reservation. This change happens automatically based on the pool’s validity period. SUSPENDED Once user want to suspend allocation from activated pool, this will release the inventory into common pool; this will be a terminal state. - From the top right corner, click on the CREATE POOL button.

- You will come across the CREATE RESERVATION POOL as per the image below. Fill in the details as mentioned in the table below.

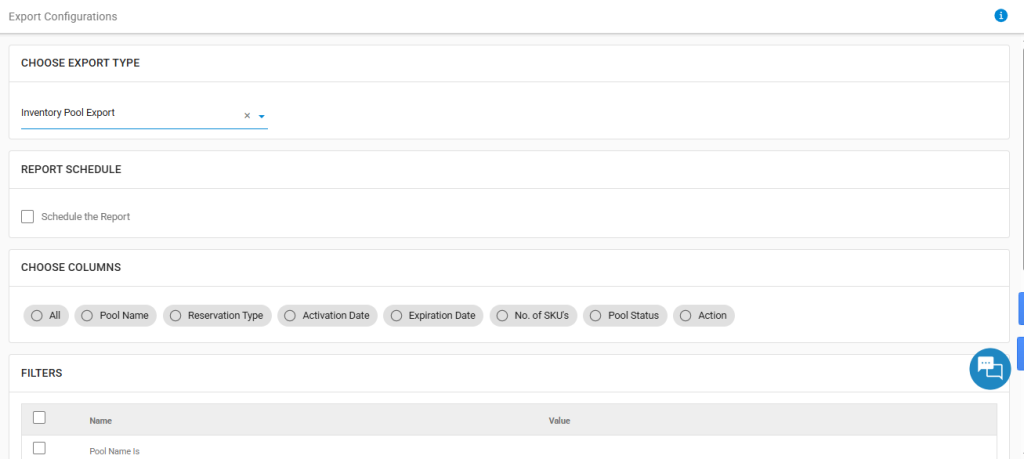
Parameter(s) Description Pool Name Enter the Pool Name Pool Reservation Type Select the value from the dropdown. (Note: If nothing is selected in the dropdown, the Channel option will be considered.) Option Description Safety Pool This is a reserved portion of inventory that’s blocked from regular allocation to ensure it’s available for critical or high-priority use. It acts as a buffer and is not used unless absolutely necessary, helping maintain availability for essential needs when overall stock runs low. (Note: Inventory reserved in safety cannot be used for inventory allocation that is while we are allocating the inventory we will not be considering the inventory of safety pool.) Sale Order This is a reserved pool of inventory tied to a specific sale order. The inventory is blocked based on the details of that particular order, ensuring that the required quantity is set aside and not allocated elsewhere. This helps guarantee that once the sale order is created, its fulfillment is not impacted by other incoming requests or stock movements. Channel This is a reserved pool of inventory created specifically for a particular sales channel. The inventory is blocked based on the channel selected, ensuring that each channel gets its own dedicated stock. This helps prevent one channel from consuming inventory meant for another, making order fulfillment more reliable and organized across platforms. Customer This is a reserved pool of inventory blocked specifically for a particular customer. Once a customer is tagged, the required stock is set aside just for them, ensuring their orders are prioritized and fulfilled without any risk of that inventory being used elsewhere. It’s especially useful for VIP clients or B2B partners with committed stock requirements. Channel Select the Channel. Here, one or more channel can be selected in a pool, and this field is applicable only when you select Channel or Customer from the Pool Reservation Type dropdown. (Note: It will only be enabled if the Pool Reservation Type is selected is channel). Customer Code Select the customer code. This field is applicable only when you select Customer from the Pool Reservation Type dropdown. Activation Date Enter the date from which the pool needs to be activated. (Note: This date cannot be less than or equal to the current date). Expiration Date Enter the expiry date of the pool. (Note: This date cannot be less than or equal to the Activation date). You can edit the Activation Date or Expiration Date of the Pool, befor it’s activation. To do so, click on the EDIT button.

- After your Pool is successfully created, click on the pool name. You will be redirected to the screen for that particular pool. Once redirected, have to upload the SKU wise planned inventory.

- To upload the details of the pool, click on the upload button from the top right corner. You will be redirected to the Import Job page. Here, click on Dowmload Template and Instruction, after which, a CSV file will be downloaded in your system. After filling all the details, upload the CSV file.
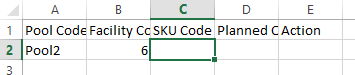
Field Description Pool Code Enter the pool code. (This field is pre-filled). Faciltiy Code Enter your facility code in which you want to create the pool. (This field is pre-filled). SKU Code Sku Code of the item which needs to be reserved in the pool. Planned Quantity Planned Quantity of the SKU to be reserved. Action Add/Edit - After you upload the CSV file successfully, you can see the details of the items in your pool. To do so, click on the pool name, and you will be redirected to the POOL ITEM DETAILS page. Here you will se the following columns.

Column Description Sku Code Sku Code Sku Name Sku Name Planned Inventory -
Inventory user want to reserve. It is just the value for visibility and doesn’t have any significance for inventory calculation. Eg: 10000
-
(value will not get reduced)
Reserved Inventory -
Actual inventory transferred from Common Pool at the time of reserving the pool
-
That is the initial value reserved Eg: 7000
-
(value will not get reduced)
Utilised Inventory The inventory from the pool which has been utilised. Available Inventory -
Remaining available inventory for inventory allocation. Eg: 5000
-
Every inventory blocked for the order or utilised will be removed from “Available Inventory”
Unrestricted / Common Inventory -
Inventory in this pool is Available + not synced inventory.
-
It is Common Pool available for demand for which the reservation pool is not created. Also its inventory could be for order for which some reservation pool is available but inventory is partiall or fully not available.
Short Inventory Short Inventory = (Reserved Inventory – Planned Inventory ) Action Edit/Delete action Note: Inventory of SKU will be reserved at the date of the activation based on the planned inventory and available inventory in unrestricted/common pool.
-
- You can select the SKU rows of Pool Items Details page and can click ACTIONS > Adjust to adjust the short inventory.

- You can perform the actions Edit/Delete by clicking on the icons from the right side of the pool details row.Edit : It is to modify the planned inventory of the existing SKU.
Delete: To remove the SKU and its inventory from the pool.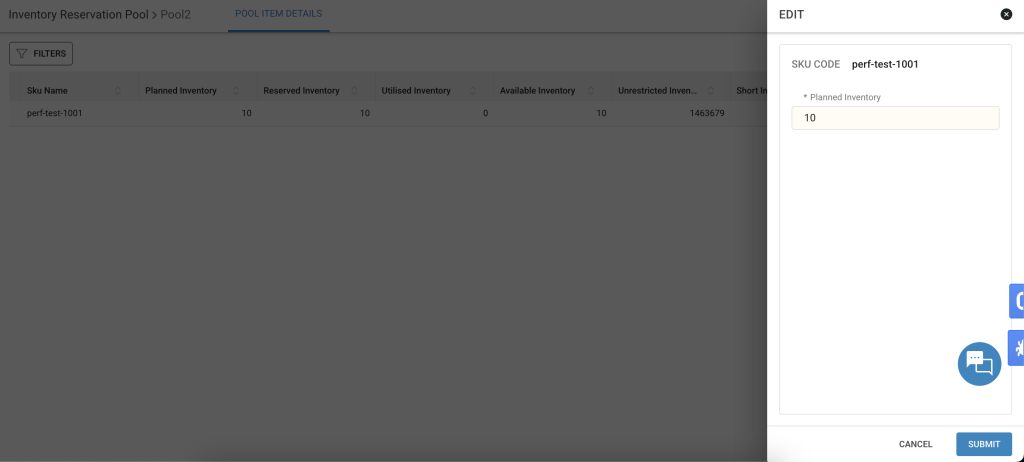
Note: User can also upload csv to edit planned inventory, remove the SKU and or add new SKU.
Export
- Login in your uniware account.
- Navigate to the Dashboard > Other Reports.
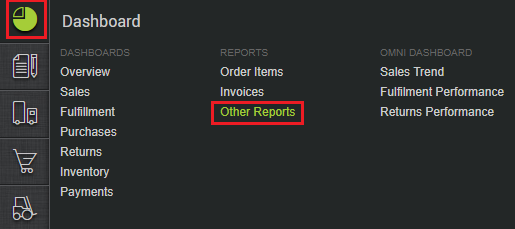
- Here, you will have the option to download reports from the following exports.
- Inventory Pool Details Export
- Inventory Pool Export
- You can download the reports according to your requirements.