
Purpose
The B2B Handheld Picking feature in Uniware (WMS) streamlines the fulfillment process by requiring SKU-wise scans.
This ensures high-precision and picking, significantly enhancing picking accuracy and reducing manual errors during warehouse operations.
Key-Features
- Accrued Inspection: If they scan the shelf before scanning the item, then scanning the SKU level-wise inspection increases accuracy.
- Short Pick Management: Easily flag missing inventory in real-time to maintain accurate stock levels.
- Searchability: Systematic SKU-wise placement allows for faster SKU retrieval within the warehouse.
Configuration
The required configuration is needed to process a B2B Order using a handheld unit.
Step-1: Visit Uniware Menu, Hover Tab Settings & Click General Settings
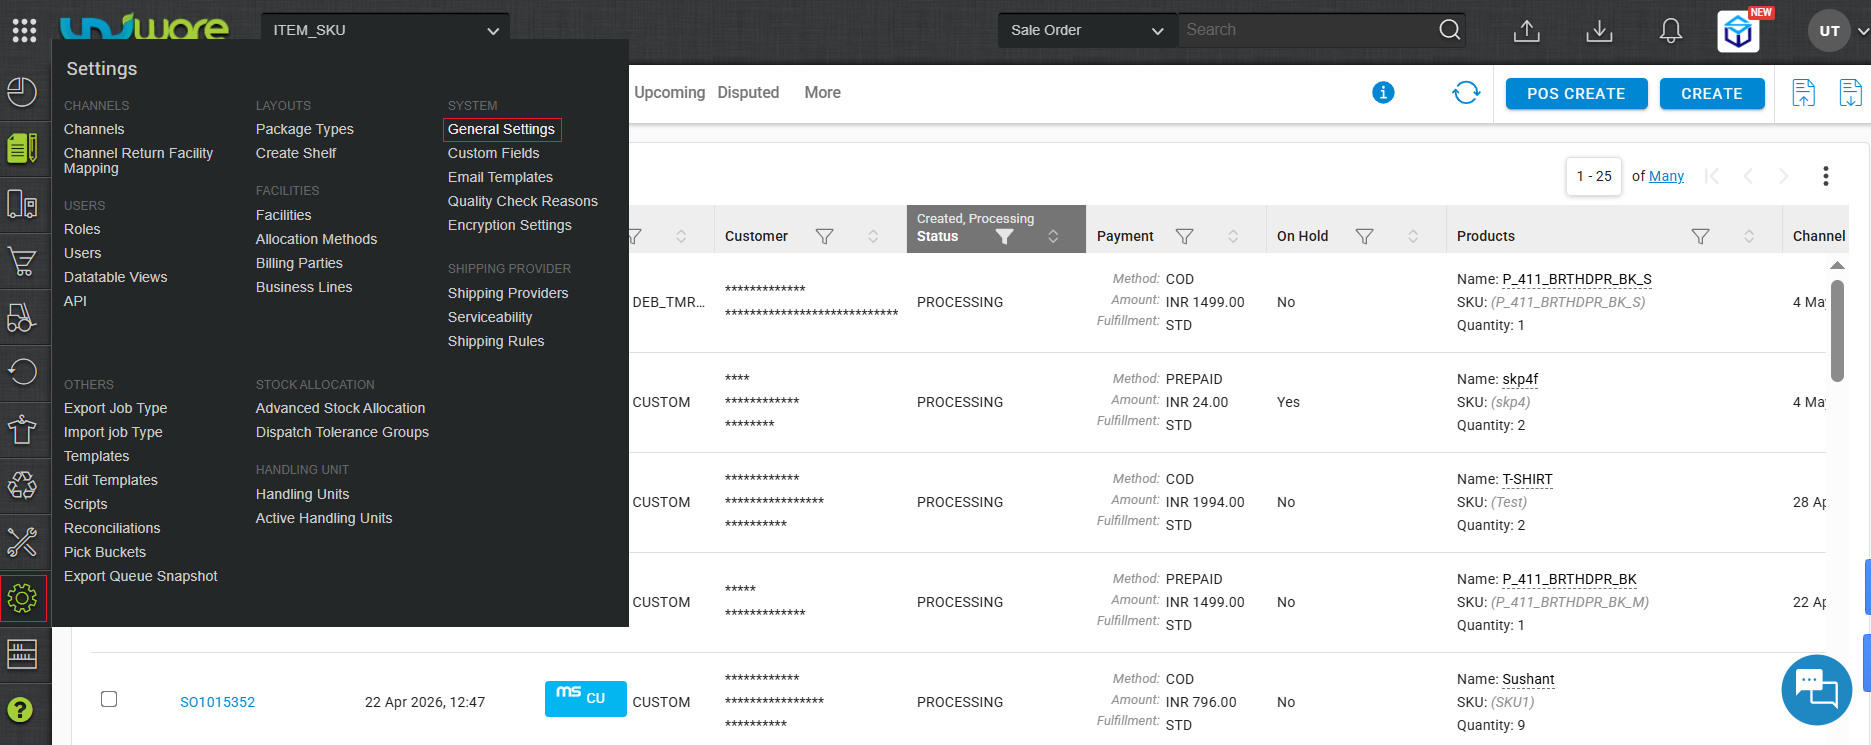
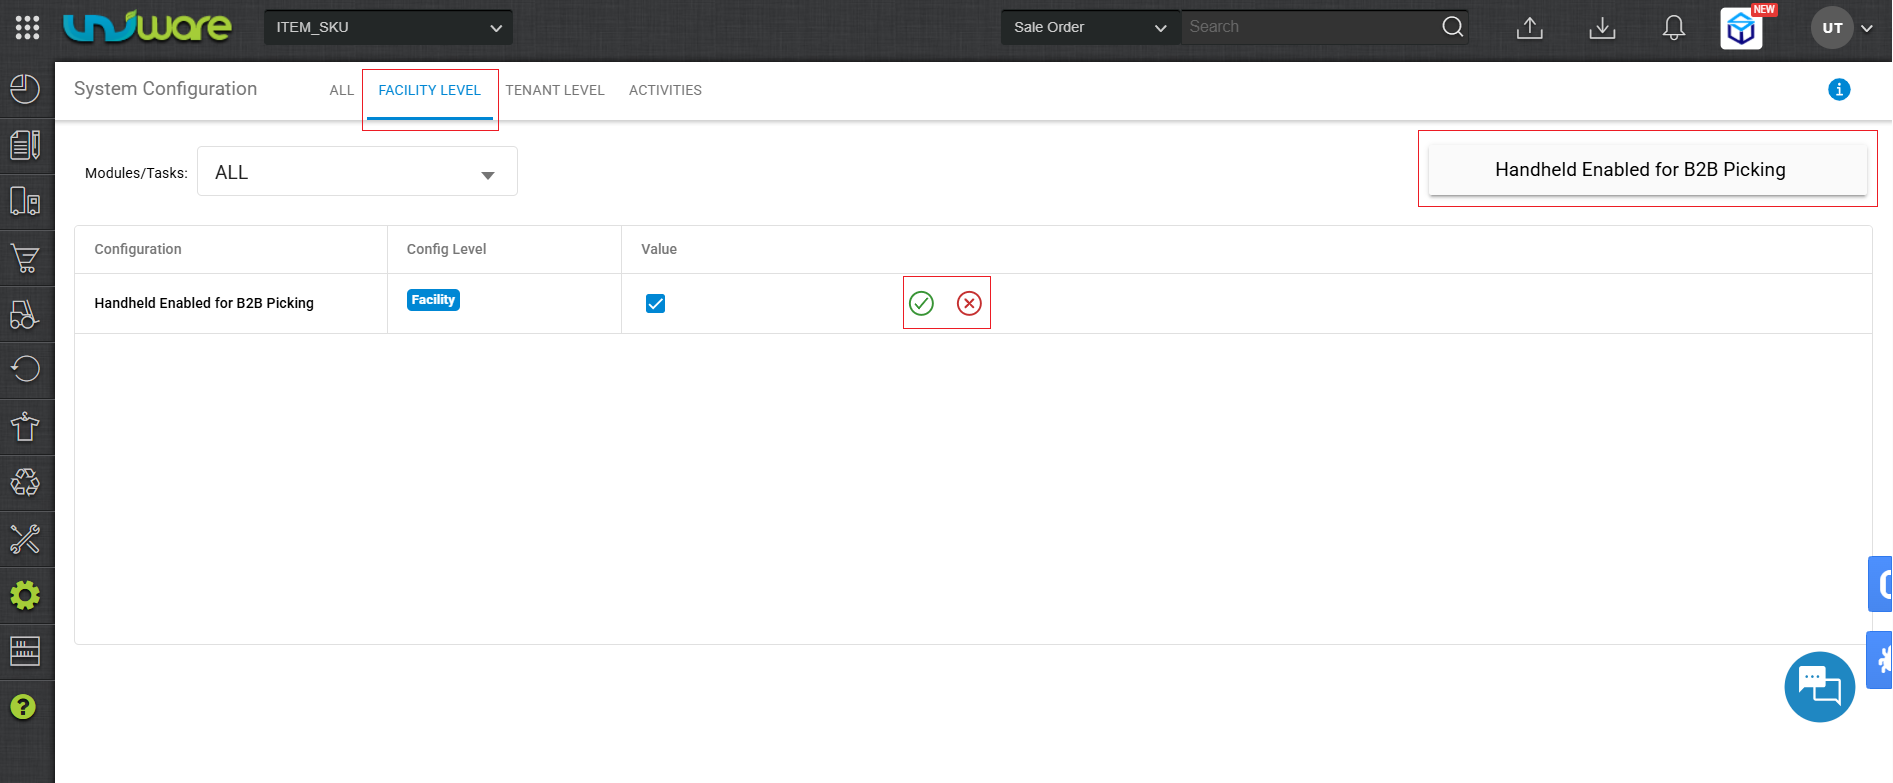
Step-2: Click on the Facility Tab, Search & select Yes for Handheld Enabled B2B Picking.
How to Work
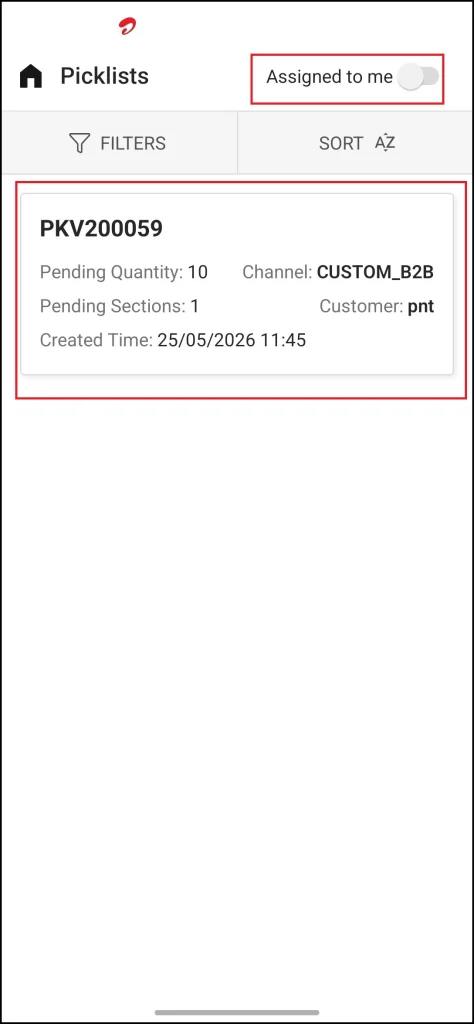
Step-1: Home Screen shows Picklist, Switch Toggle, clicking on the assigned Picklist Assigned to me, and click Shown Picklist.
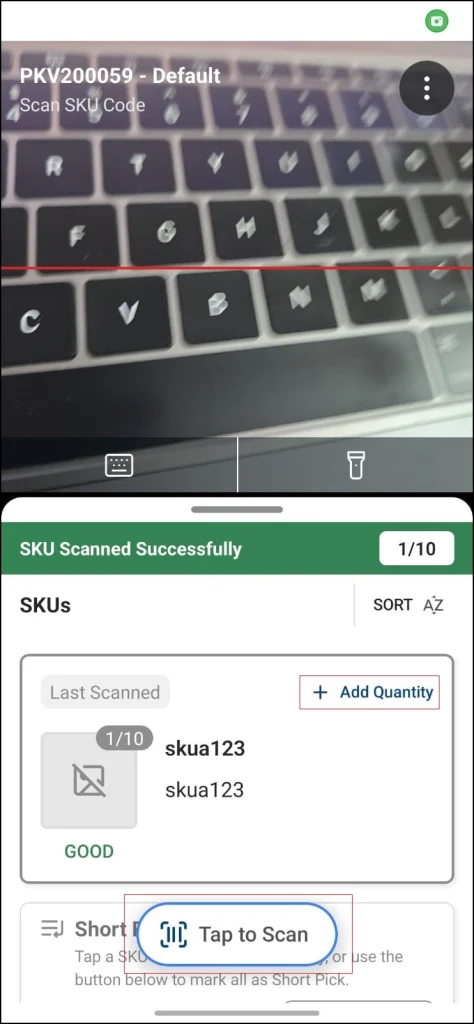
Step-2: Click Tap to Scan for the given shelf scan.
This screen shows that the shelf is ready to scan as per SKU Wise by clicking on the Tap to Scan button.

Step-3: Click Tap to Scan to scan the SKU in the allocated shelf as per the chosen picklist.
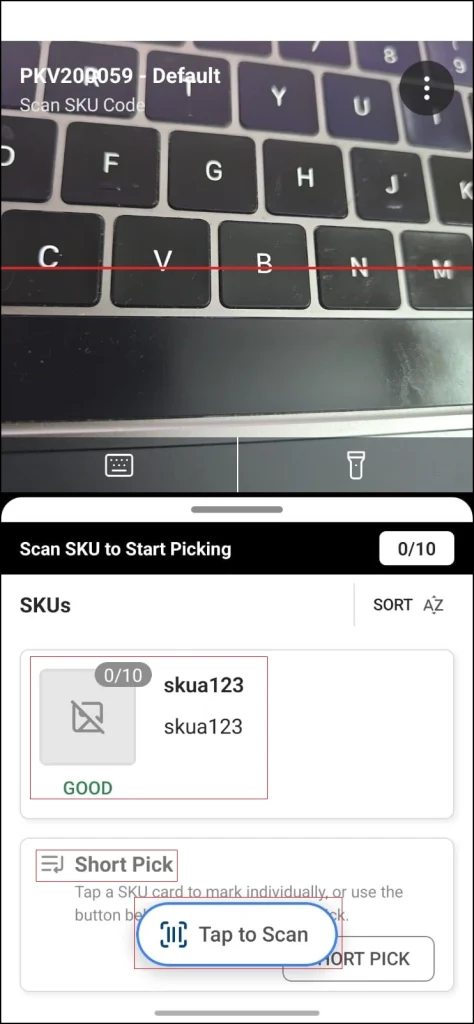
| Note: Must ensure that after every SKU Scan, scrolling down for the Short Pick Button. Click Short pick if the SKU is not found in the chosen shelf for the scan. |
Step-4: Click “+Add Quantity” or click Tap to Scan to scan the next SKU.
If the same SKU has a quantity, click Tap to Scan to scan the next SKU.
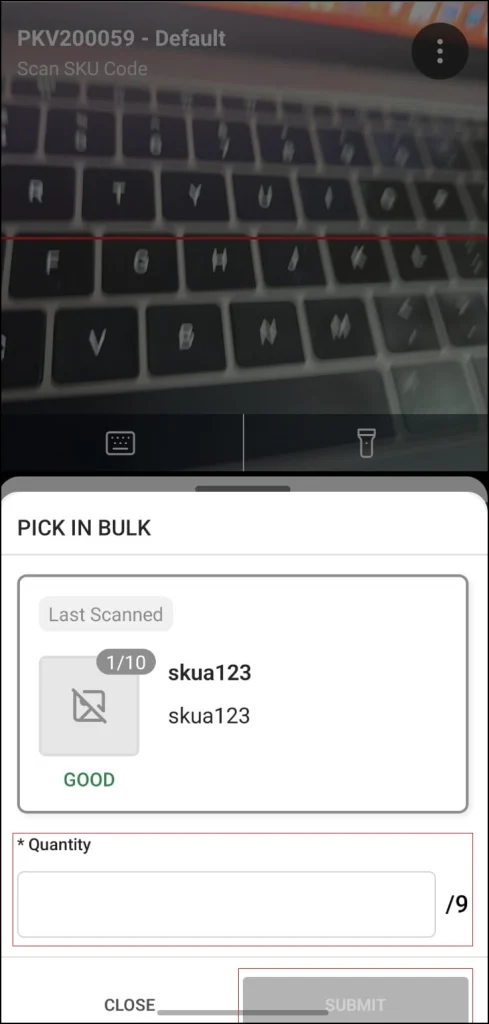
For bulk picking, click on +Add Quantity and enter the quantity, which shows in step -5.
Step-5: Mention the number of quantities of SKU & Click Submit.
For bulk picking, enter a quantity of SKU.
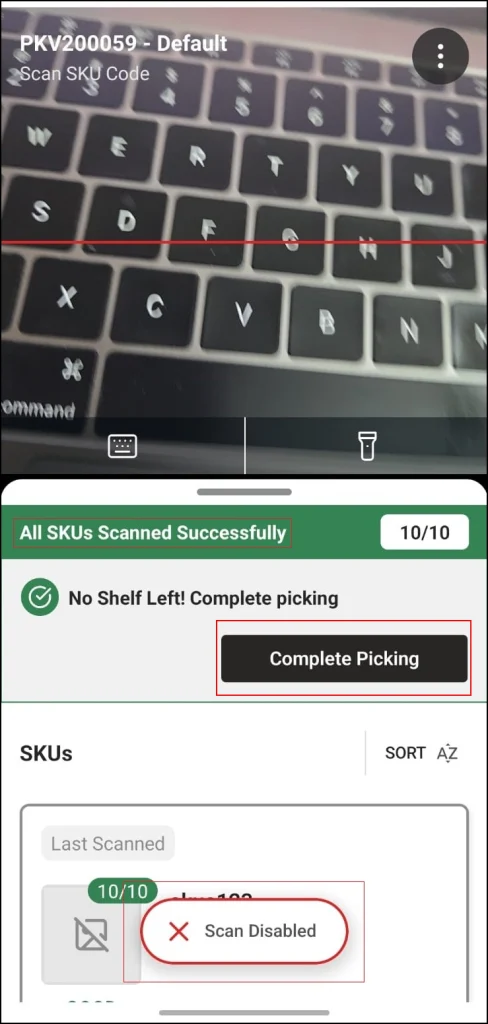
Step-6: Mark all the SKU’s get successfully scanned.
Click Complete Picking once you see the Scan Disabled option.
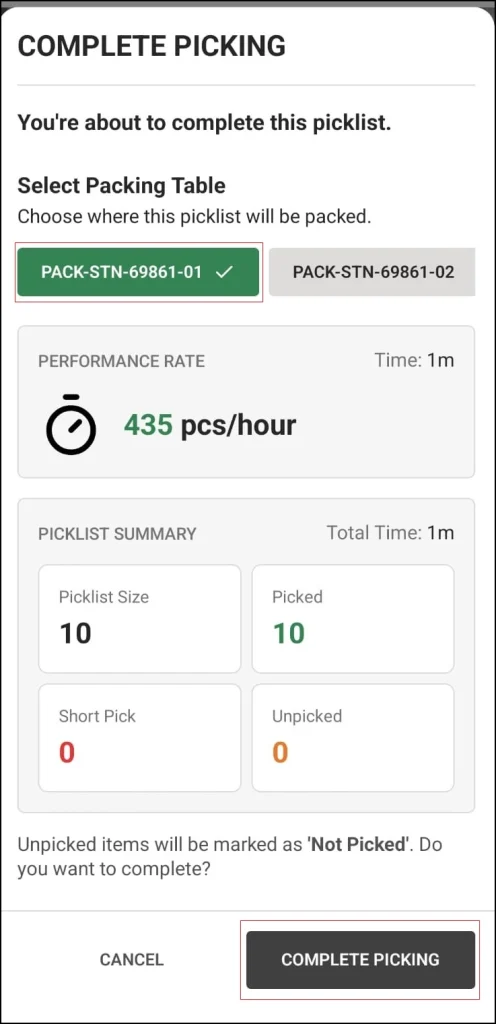
Step-7: Click on Picklist to view/change the picklist & Click Complete Picking.
In the Complete Picking Tab, it shows the assigned picklist of where the SKU gets scanned.
Click on COMPLETE PICKING one’s you sure about all the SKUs gets scanned
Frequently Asked Questions (FAQ’s)
Configuration & Setup
Q1: How do I enable B2B picking for handheld devices in Uniware?
A: Go to Settings > General Settings, click on the Facility tab, search for “Handheld Enabled B2B Picking,” and set the value to Yes.
Q2: Is this feature applicable to both B2C and B2B orders?
A: Based on this specific configuration, these steps are designed to process B2B Orders using a handheld unit to ensure SKU-level traceability.
Operational Workflow
Q3: Can I scan the SKU before scanning the Shelf?
A: No. The system follows “Accrued Inspection,” which requires you to scan the Shelf first and then the SKU. This ensures higher accuracy and confirms you are picking from the correct location.
Q4: How do I handle multiple quantities of the same SKU?
A: Once the SKU is scanned, you can either click the “+Add Quantity” button to manually enter the total count or continue to scan each unit individually using the “Tap to Scan” button.
Q5: What should I do if I am assigned a picklist but cannot see it on my home screen?
A: On the Home Screen, ensure the toggle is switched to “Assigned to me” and then click on “Shown Picklist” to view your specific tasks.
Exceptions & Errors (Short Picks)
Q6: What should I do if an SKU listed in the picklist is missing from the shelf?
A: You must mark it as a Short Pick. After scanning the shelf, scroll down to find the “Short Pick” button. Clicking this will record that the SKU was not found in the allocated shelf.
Q7: Where is the “Short Pick” button located? I can’t see it on the main scan screen.
A: The Short Pick button is located below the SKU details. You must scroll down after every SKU scan/check to access the button if the SKU is missing.
Completion & Validation
Q8: Can I undo a picklist once I have clicked “Complete Picking”?
A: The guide advises clicking “Complete Picking” only once you are certain all SKUs have been successfully scanned and accounted for. Ensure all SKU are marked as scanned before finalizing.
Q9: How does this handheld process improve warehouse efficiency?
A: It enhances SKU Level Traceability and increases searchability. By scanning SKU-wise, the system provides exact instructions on where to place or find SKU, reducing manual errors and search time.
Q10: What happens after I click “Submit” for the SKU quantities?
A: Clicking submit confirms the count for that specific SKU. You can then proceed to the next SKU in the picklist or move to the final step to Complete Picking.